
We’ve all seen it: a beautiful mid-century dresser ruined by a thick, gloppy coat of “TikTok-trendy” teal paint. It’s the ultimate “thrift flip” tragedy. When you set out to refinish thrifted furniture, the goal isn’t just to change the color—it’s to restore the soul of the piece. The difference between a masterpiece and a “cheap DIY” project lies entirely in the professional furniture restoration techniques you use before the first drop of paint even touches the wood.
If you’re tired of your projects looking like they belong in a college dorm, it’s time to stop cutting corners. Achieving a high-end wood finish requires patience, the right grit, and a bit of “insider” knowledge. Let’s break down the non-negotiables that will take your Facebook Marketplace finds from “drab” to “designer.”
The Prep Work: Why 80% of the Result is Invisible
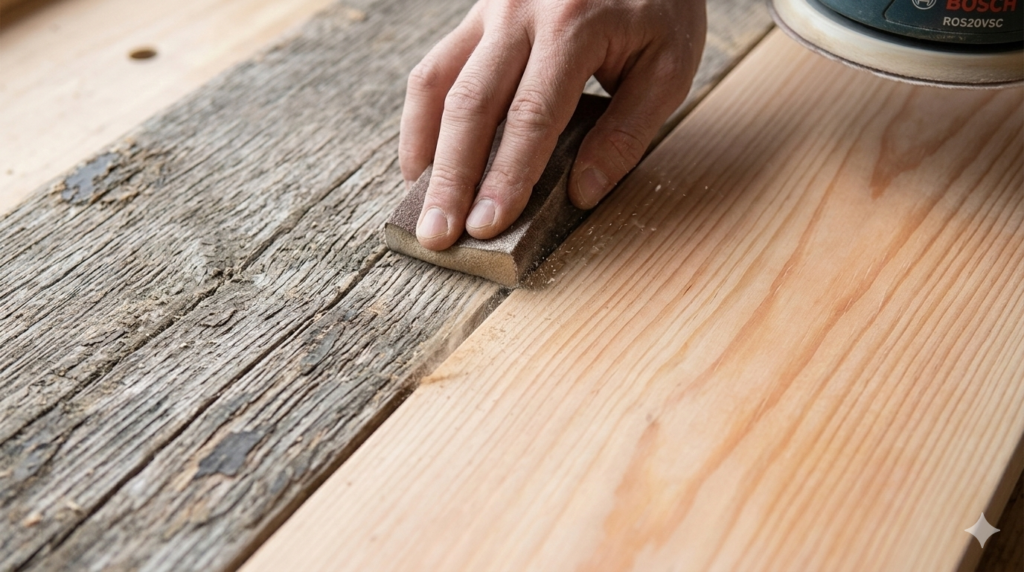
The biggest mistake amateurs make is rushing to the “fun part”—the staining. But professional sanding techniques are what actually determine the final quality. If you leave behind old lacquer or uneven scratches, the new stain will highlight those flaws like a neon sign.
Start with a coarse grit (80-100) to strip the old finish, then move to a medium (120-150), and always finish with a fine 220-grit. The “Pro Secret”? Wipe the wood with a damp cloth (water popping) before your final sand. This raises the grain, allowing you to sand off the tiny fibers for a glass-smooth surface.
Staining vs. Toning: The Key to a “Bespoke” Look
Most DIYers reach for a can of “all-in-one” stain. Pros don’t. To avoid a muddy, cheap appearance, you need to understand the difference between wood staining and toning. Staining penetrates the fibers, while toning (using a translucent colored spray) sits on top to even out the color.
For woods like Maple or Cherry that blotch easily, use a wood conditioner first. This ensures the pigment absorbs evenly, preventing that “patchy” look that screams amateur hour.
The Pro Refinishing Kit vs. The Amateur Kit
If you want professional results, you need to move beyond the foam brush. Here is the breakdown of what actually makes a difference in the final product.
| Tool/Material | The “Amateur” Choice | The “Pro” Choice | Impact on Result |
| Applicator | Foam Brush | Synthetic Tipped Brush | No brush strokes; smoother leveling. |
| Sandpaper | Standard Sheets | Hook & Loop Discs | More consistent pressure; less swirling. |
| Primer | None | Shellac-Based Primer | Blocks tannins and prevents “bleed-through.” |
| Topcoat | Glossy Polyurethane | Satin Lacquer or Wax | A sophisticated, “low-luster” expensive glow. |
hoosing the Right Sheen: Why “Matte” is the New Luxury
If you want your furniture to look like it came from a high-end gallery, stay away from high-gloss finishes. High gloss reflects every imperfection in the wood. Professional furniture finishes in 2026 lean heavily toward “Satin,” “Eggshell,” or “Dead Flat.”
A satin finish provides enough protection for daily use but keeps the light reflection soft, which mimics the look of expensive, hand-rubbed oil finishes. For a deep-dive into the chemistry of topcoats, check out Bob Vila’s guide to wood finishes, which explains why durability doesn’t have to mean “shiny.”
The “Tannin Bleed” Nightmare and How to Fix It
Have you ever painted a piece white only to see yellow or pink spots appearing hours later? That’s tannin bleed. This happens most often with Mahogany, Oak, and Cedar.
The Fix: Never use a water-based primer on these woods. You need a shellac-based primer (like Zinsser B-I-N). It acts as a chemical barrier that locks the oils inside the wood, ensuring your “designer white” stays crisp and clean forever.
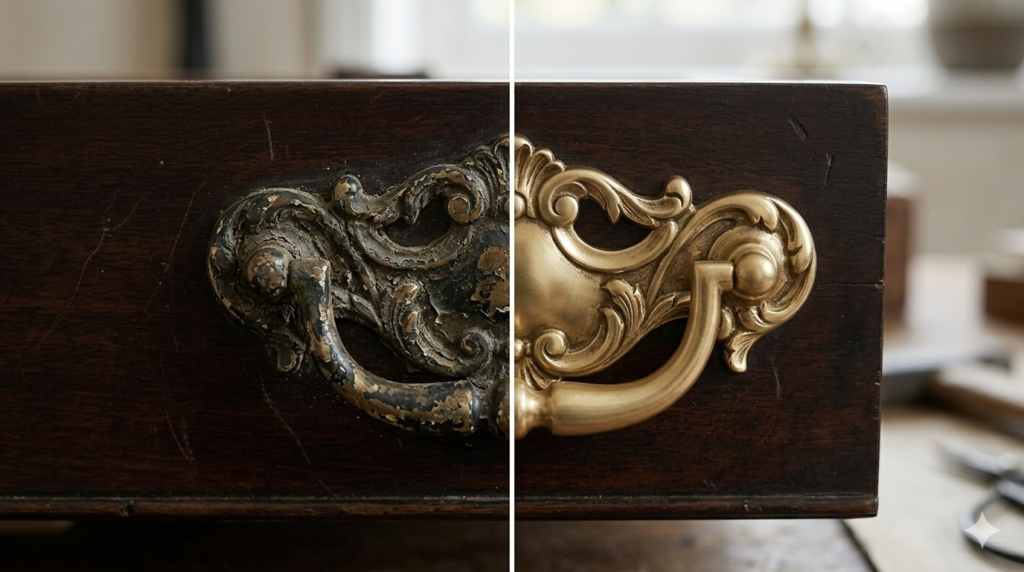
Hardware Restoration: Don’t Just Buy New
Sometimes, the original hardware is the best part of a thrifted find. Instead of buying cheap, modern replacements, try restoring the originals. A soak in a “Crock-Pot” with water and baking soda can strip decades of old paint off brass handles in hours. This keeps the authentic vintage aesthetic while giving the piece a fresh, clean feel.
FAQ: Mastering the Furniture Flip
Q: Can I refinish veneer, or only solid wood? A: You can refinish veneer, but be extremely careful! It is very thin. Use 220-grit sandpaper only and sand by hand to avoid burning through to the particleboard underneath.
Q: How long should I wait between coats of stain? A: Patience is your best friend. Wait at least 24 hours. If the wood feels “tacky” or cool to the touch, it’s not dry yet. Applying a topcoat over damp stain is the #1 cause of peeling.
Q: What is the most durable topcoat for a dining table? A: For high-traffic surfaces, use an oil-based polyurethane or a modern ceramic-infused topcoat. They offer the best protection against water rings and scratches.