
There’s a version of bedroom fairy lights that looks like someone’s college dorm in 2015 — a string of warm-white LEDs tacked unevenly around a window frame, sagging in the middle, plugged into a power strip on the floor with the cord running along the baseboard. It’s the same product. It just wasn’t installed with any particular intention.
And then there’s the other version — the one you screenshot on Pinterest at midnight and stare at thinking “why does mine not look like that?” The lighting is soft and even. There are no visible cords. The lights follow the architecture of the room rather than fighting it. It feels like a deliberate design choice rather than decoration someone did on a Sunday afternoon and never reconsidered.
The difference between those two versions isn’t the lights themselves. It’s the placement, the length of the strand, how they’re fixed to the wall, and whether the cord situation has been solved. All four of those are fixable problems — and none of them require drilling holes or spending more than an evening on the whole thing.
This guide covers five fairy lights bedroom placements that consistently look good, with specific strand lengths for each, the right fixings for renters, and the one mistake that makes even nice lights look cheap.
Key Takeaways
- Strand length is the most important pre-purchase decision: Buying 10 feet of lights for a 12-foot headboard wall is the fastest route to disappointment — measure the path your lights will travel before buying, adding 20% for draping and slack
- Warm white (2700K–3000K) is the only color temperature worth buying for a bedroom: Cool white and colored lights look festive, not cozy — they activate the space rather than winding it down, which is the opposite of what a bedroom needs from ambient lighting
- Command strips hold up to 7.5 lbs per strip when applied correctly: Most fairy light strands weigh under 1 lb total, which means two strips at key anchor points are sufficient for wall and ceiling installations without damaging paint
- The cord problem needs to be solved at the power outlet: A visible cord running down a wall from lights to outlet ruins every fairy light installation regardless of how good the lights themselves look — plan the outlet proximity before choosing placement
- Research published in Sleep Medicine (2019) found that dim, warm-toned lighting in the 60–90 minutes before sleep supports melatonin production, while bright overhead lighting suppresses it — fairy lights at 2700K used as the primary evening light source are functionally beneficial, not just decorative
Before You Buy: The Two Measurements Nobody Takes
Walk around your bedroom once before ordering anything. Two measurements determine whether the whole thing works.
Measurement 1: Strand length needed
Lay a piece of string or measure tape along the exact path your lights will travel — not the straight-line distance, but the actual route. Ceiling to one side of the headboard wall, along the wall, down the other side. Around the window frame. From the curtain rod across the ceiling to the opposite corner.
Add 20% to whatever that number is. Lights that have enough slack to drape softly look intentional. Lights pulled taut between two points look like a clothesline. The extra 20% is what creates the natural curves that make fairy lights look like they belong there.
Measurement 2: Distance from placement to outlet
Fairy lights need power. The cord from the lights to the outlet is the thing most people figure out after installation, and by then the placement decision has already been made incorrectly. Before choosing where your lights go, stand at your chosen wall and look for the nearest outlet. If it’s on the opposite side of the room, battery-operated lights are a better choice for this particular spot than plug-in — no cord running across the floor.
I have an editorial opinion here: the cord problem is underrated as a reason why fairy lights don’t look good. A beautiful installation with a white extension cord taped diagonally across a dark wall undoes everything the lights were meant to do. Solve the cord first.
The 5 Placements That Consistently Work
Placement 1: Behind the Headboard (The One That Photographs Well)
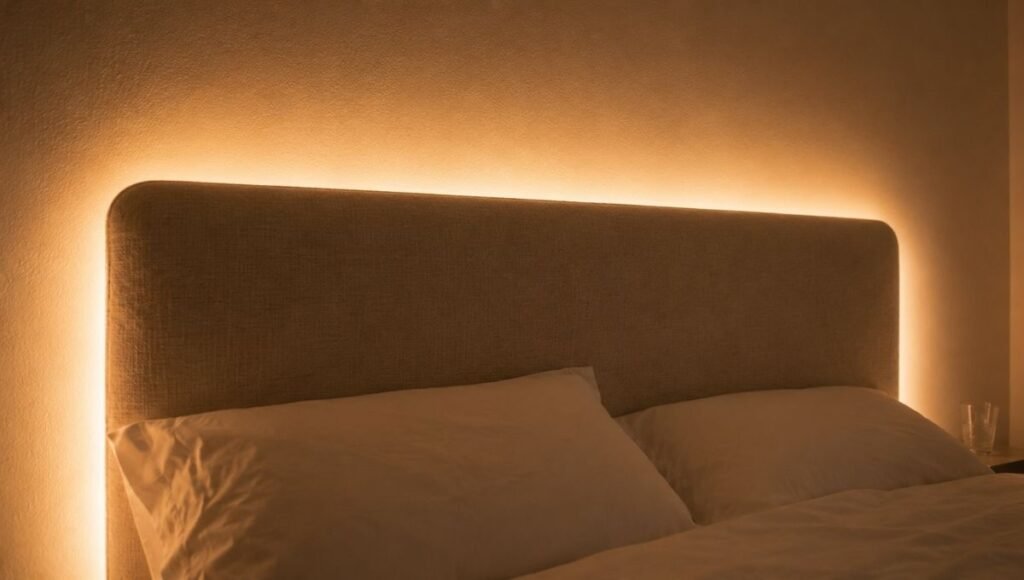
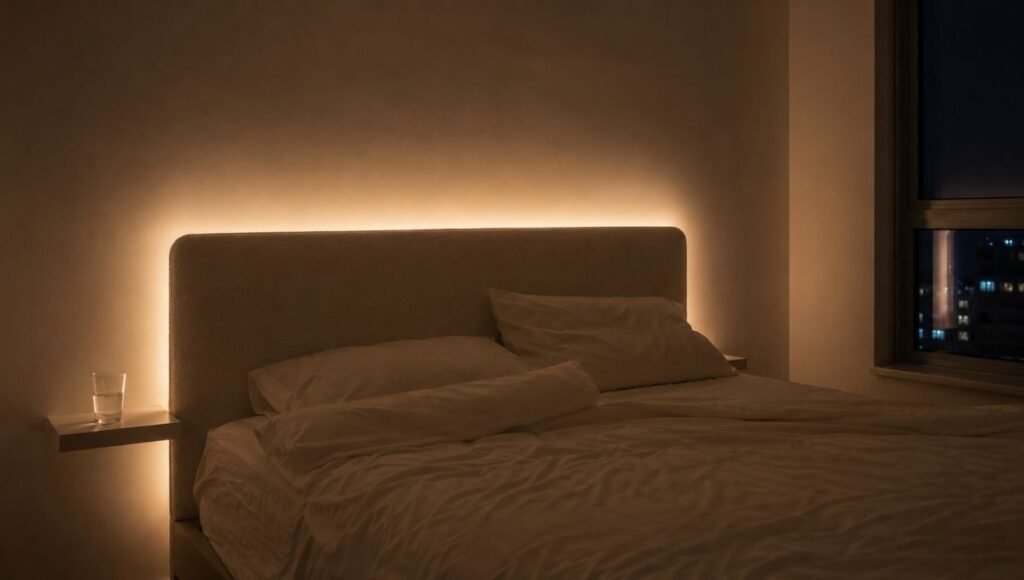
Mounting fairy lights directly to the wall behind and just above the headboard — with the lights tucked so only the glow is visible rather than the strand itself — creates a soft backlight that makes the bed the visual anchor of the room. It looks professionally styled. The headboard casts a slight shadow that makes the glow more diffuse and less glaring.
How it works: Fix the lights at the wall behind the top of the headboard, angled so they shine upward toward the ceiling rather than straight out into the room. The headboard itself blocks the strand from direct view. What you see is a warm halo around the head of the bed.
Strand length: Measure the width of your headboard or bed frame and add 20%. For a queen bed (60 inches / 5 feet), you need a 6-foot minimum strand for this placement — though 10 feet gives you enough to extend slightly beyond the headboard on each side, which looks more considered than lights that stop exactly at the headboard edge.
Fixing method for renters: Two Command large picture-hanging strips at each anchor point (one on each side where the strand begins and ends). The strand itself can be looped over the headboard rather than fixed to the wall — no wall contact at all for this placement, which makes it the easiest installation in this guide.
The cord solution: If your headboard is against the wall nearest an outlet, run the cord down behind the headboard to the outlet — completely invisible. If not, battery-operated lights with a small battery pack that sits behind the headboard work perfectly here.
Placement 2: Draped Along the Ceiling Perimeter (The Room-Expansion Effect)
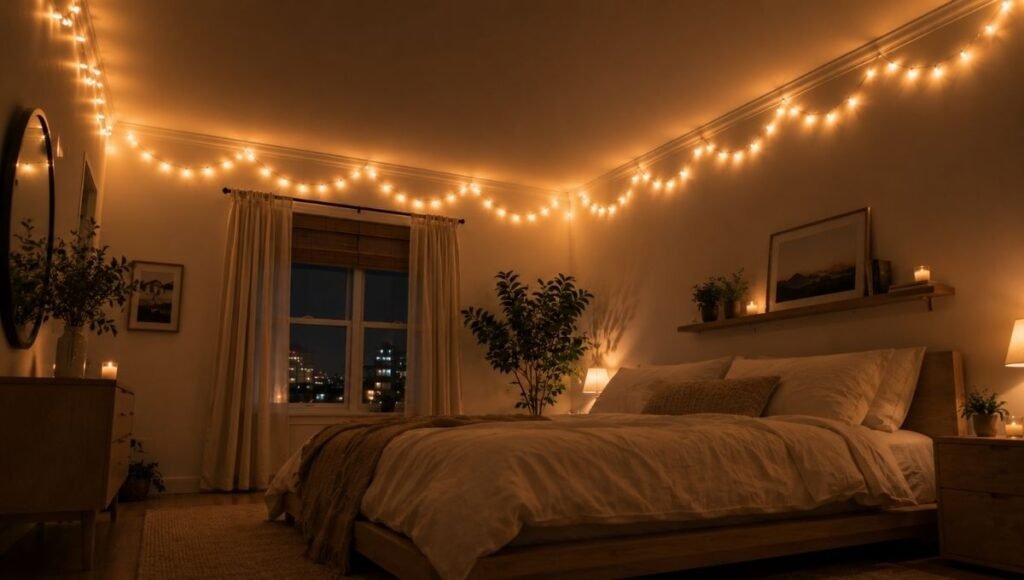
Running fairy lights along the junction where the ceiling meets the wall — draping slightly downward along the ceiling edge — draws the eye upward and makes the room feel taller. In a small bedroom where the ceiling is a forgotten surface, this placement adds a layer of depth that overhead lighting never provides.
This is different from lighting the entire ceiling, which requires a lot of strand length and can look chaotic. Perimeter lighting follows the architecture of the room rather than covering it.
How it works: The lights run along two or three walls (not all four — three walls creates the glow; four walls reads as a stage set), draping 4–6 inches below the ceiling line rather than pressed flush against it. The sag is intentional. It reads as casual and deliberate simultaneously.
Strand length: For a 10×12-foot bedroom lighting three walls: (10 + 12 + 10) = 32 feet minimum, plus 20% slack = approximately 38–40 feet. Most fairy light sets are sold in 33-foot (10m) rolls; you’ll need two for this placement in a standard small bedroom.
Fixing method for renters: Command mini hooks (rated 0.5 lbs each) placed every 12–16 inches along the ceiling edge hold the strand in gentle scallops. The hooks are small enough that even two rows of them along the ceiling line leave minimal evidence on removal. Apply according to the package instructions — wait the full 24 hours before hanging anything.
The cord solution: This placement works best with a plug-in strand that enters from the corner nearest the outlet. The cord runs vertically down the corner of the room — the one spot in a bedroom where a cord becomes nearly invisible because corners don’t register in peripheral vision the way flat walls do.
Placement 3: Curtain of Lights (The Most Photographed, The Hardest to Execute Well)

Fairy light curtains — strands hung vertically in parallel lines from a curtain rod or ceiling hook, falling to the floor or bed surface — are everywhere on Pinterest and notoriously difficult to make look good in practice. The installations that work share one quality: even strand spacing.
What goes wrong: Uneven spacing between vertical strands. Strands of different lengths that don’t reach the same height. Visible horizontal connectors between strands. A power cord that exits from one end of the curtain and runs down the side.
How it works when it works: The curtain is hung from a single horizontal rod or tension rod across the width of the wall behind the bed. Strands fall evenly spaced — every 3–4 inches for a dense curtain, every 6–8 inches for a more airy one. The power entry point is in the top center, where the cord can run along the rod and down behind the headboard.
Strand length: For a queen bed wall (60 inches wide) at 7-foot ceiling: a 200-count strand curtain panel covering 3×3 feet typically provides the density needed for the dense version. Most curtain light sets are sold as pre-assembled panels — buy rather than DIY for the even-spacing problem.
Fixing method for renters: A tension rod across the width of the wall — no installation required. The rod sits in the wall cavity created by the corners of the room behind the bed, or between two pieces of furniture. This is the only renter-friendly option here, and it works particularly well for this placement because the rod is completely hidden by the lights.
Placement 4: Along Bookshelves or Floating Shelves (The One That Takes 10 Minutes)
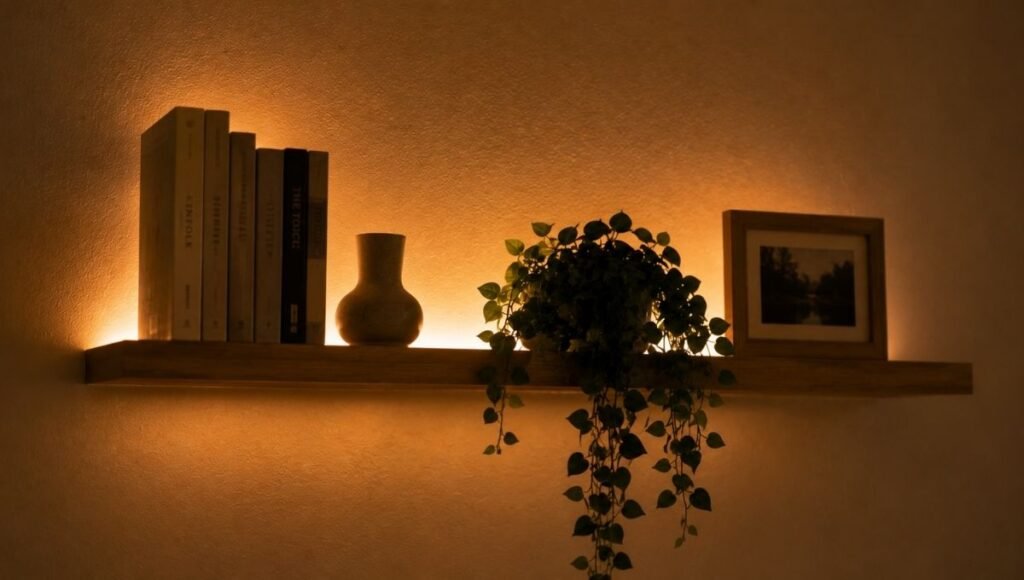
This is the fastest installation and the lowest-risk aesthetically. Running a strand of fairy lights along the back of a bookshelf or behind objects on floating shelves creates backlighting that makes the shelf look curated rather than just full of stuff.
Why it works: The books and objects in front diffuse the light. You see the glow around the objects rather than the strand itself. In a bedroom where a bookshelf serves as a headboard alternative or room divider, this placement adds the ambient glow without any wall installation at all.
Strand length: Measure the length of the shelf and add 50% (more slack than other placements — the lights need to weave between objects). For a 48-inch floating shelf: approximately 6 feet of strand.
Fixing method: None required. The strand sits behind objects on the shelf, held in place by the objects themselves. For a more deliberate installation, a single Command mini hook at each end of the shelf keeps the strand from drifting forward.
The cord solution: Run the cord down behind the shelf to the nearest outlet. If the shelf is wall-mounted with visible brackets, the cord can run along the bracket in the gap between the bracket and the wall — largely invisible.
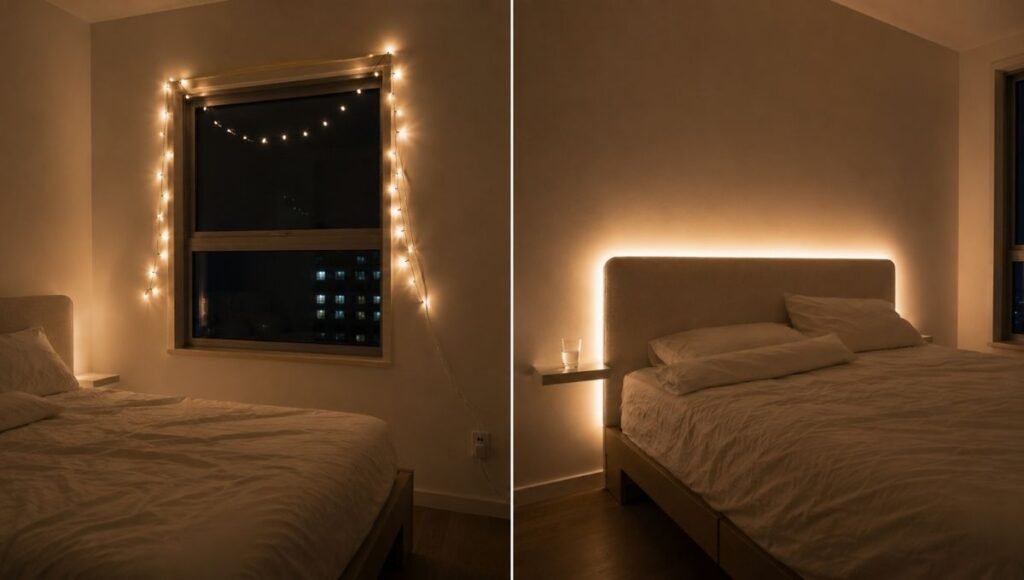
Placement 5: Window Frame Outline (Best for Small Bedrooms)
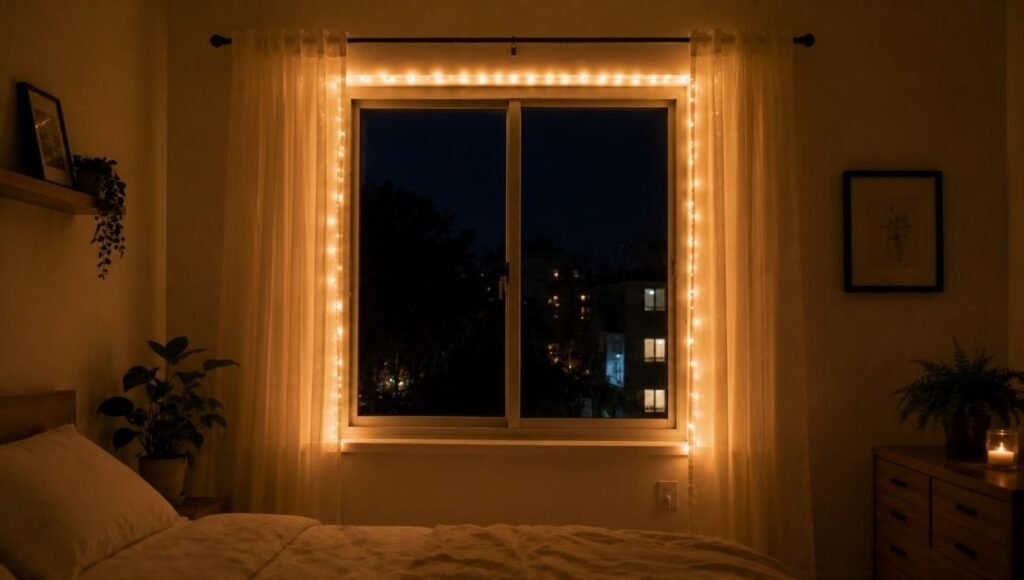
Outlining a window frame with fairy lights — running the strand along the interior edge of the window molding — works especially well in small bedrooms because it uses the window as an architectural anchor rather than requiring additional wall space. During the day, the lights are barely visible; in the evening, they create a warm glow around the most light-source-appropriate location in the room.
How it works: The strand follows the three sides of the window frame (two vertical sides and the top horizontal — not the bottom, where the cord would have nowhere to go). The natural stopping point is the bottom of the vertical sides, where the cord drops to the outlet below.
Strand length: Measure the window perimeter on three sides and add 20%. For a standard apartment window (36 inches wide × 48 inches tall): (36 + 48 + 48) = 132 inches = 11 feet. A 12-foot strand is exactly right for this placement.
Fixing method for renters: Command mini hooks at the four corners and every 8–10 inches along the top. The vertical sides can be adhered with clear Command strips in continuous runs — the molding provides a clean surface that doesn’t pull paint on removal.
The cord solution: The cord drops from the bottom of one vertical side straight down to the outlet. If the outlet is directly below the window, this is invisible. If not, a cord clip path along the baseboard manages the horizontal run.
The One Mistake That Makes Every Installation Look Amateur
Visible cord runs — specifically, cords running diagonally across a wall, or horizontally at an odd height, or coiling on the floor below the lights.
Every placement above has a cord solution because cord management is not an afterthought. It’s part of the design. Before finalizing any placement decision, trace the path the cord would need to travel from the last bulb to the outlet. If that path is longer than 18 inches of visible cord, either choose a different placement, use battery-operated lights for that specific location, or manage the cord with clips along the baseboard or behind furniture.
The cord problem is why so many bedroom fairy light installations look like they were done by someone who planned the lights but forgot about the power.
Warm White vs. Cool White: Why It Matters More Than You Think
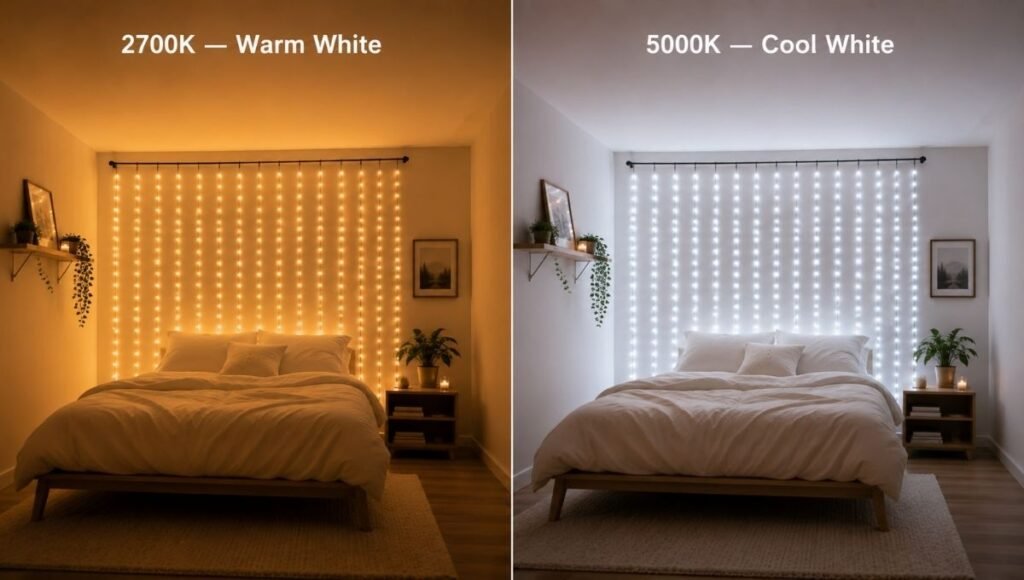
For a bedroom, the answer is always warm white — specifically 2700K to 3000K color temperature.
Research published in Sleep Medicine (2019) on light exposure and circadian rhythm found that warm, dim light in the pre-sleep window (60–90 minutes before bed) supports melatonin production and sleep onset, while cool-toned and bright light actively suppresses it. At 2700K, fairy lights are essentially doing the same biological work as a candle — signaling to your nervous system that the day is winding down.
Cool white lights (5000K+) used as evening bedroom lighting are doing the opposite. They’re activating rather than calming. They might look clean and modern in a product photo, but as a daily-use bedroom light they work against your sleep.
This isn’t a style preference. It’s a functional recommendation with a physiological basis. Buy warm white.
If You Only Have 10 Minutes
Buy a battery-operated warm white fairy light strand, 20 feet. Drape it along the top of your headboard or bookshelf — no installation, no drilling, no cord routing. It takes 60 seconds and looks significantly better than the overhead light you’ve been using every evening. This is the starting point, not the finished installation. But “significantly better than before” is a real result for 10 minutes of effort.
FAQ: Fairy Lights Bedroom
How long of fairy lights do I need for a bedroom? It depends on the placement. Headboard backlight: width of bed plus 20% (7–8 feet for a queen). Ceiling perimeter on three walls: sum of three wall lengths plus 20% (typically 35–40 feet for a 10×12 room). Window frame: three sides of window plus 20% (10–12 feet for a standard window). Curtain panel: buy pre-made curtain light panels rather than calculating from scratch.
How do you hang fairy lights in a bedroom without nails? Command mini hooks are the standard solution — rated 0.5 lbs each, removable without paint damage when removed according to instructions. For heavier anchor points, Command large picture strips hold up to 7.5 lbs per strip. Tension rods work for curtain placements. Draping over furniture (headboard, bookshelf, curtain rod) requires no fixings at all.
What color fairy lights are best for a bedroom? Warm white at 2700K–3000K. This color temperature supports melatonin production and sleep onset when used as evening ambient light. Cool white (4000K+) and colored lights are activating rather than calming — not appropriate for a bedroom’s primary ambient light source.
Should fairy lights be plug-in or battery for a bedroom? Plug-in if the outlet is within 6 feet of the placement with a cord path that can be hidden. Battery-operated if the outlet is far away, if you want to avoid cord management entirely, or if the placement is away from any wall (hanging from ceiling center, inside a shelf). Battery sets need charging or battery replacement every 4–8 hours of use — factor this into the decision.
How do you make fairy lights look aesthetic? Even spacing between anchor points, a single consistent color temperature, cords completely hidden or routed along baseboards and corners, and enough strand slack to drape slightly rather than pulled taut. The installations that look designed rather than accidental share these four qualities. The specific style — canopy, perimeter, headboard — matters less than execution of these fundamentals.
The Bottom Line
Fairy lights for a bedroom aren’t complicated — but they do require planning two things before buying: the strand length for your specific placement, and the cord route from lights to outlet. Both are solvable. Neither requires tools or permanent installation.
Start with the headboard placement if you want the fastest win. Move to the ceiling perimeter if you want the most room-transforming effect. Use warm white, always, for both the aesthetic and the sleep benefit.
For the complete bedroom atmosphere — how lighting works alongside the bedding, layout, and storage — our small bedroom layout guide covers the arrangement strategies that make a small bedroom feel designed rather than furnished. And if temperature is the other thing keeping you up, our best sheets for hot sleepers guide covers that side of the sleep equation.
References
- Chellappa, S. L., Steiner, R., Oelhafen, P., Lang, D., Götz, T., Krebs, J., & Cajochen, C. (2013). Acute exposure to evening blue-enriched light impacts on human sleep. Journal of Sleep Research, 22(5), 573–580. (Research on light color temperature and sleep quality)
- Prayag, A. S., Münch, M., Aeschbach, D., Chellappa, S. L., & Gronfier, C. (2019). Light modulation of human clocks, wake, and sleep. Clocks & Sleep, 1(1), 193–208. (Research on warm vs. cool light and melatonin production timing)
Published on Grainv.com | Category: Bedroom | Related: Small Bedroom Layout, Best Sheets for Hot Sleepers, Warm Bedroom Ideas