
The floor-standing TV cabinet is quietly making most small living rooms look smaller than they are. It sits there on four legs, occupying the full width of the TV wall from baseboard to mid-height, and visually anchoring the bottom third of the room with a horizontal block of furniture. In a room under 150 square feet, this is 8–12 square feet of floor space consumed by a piece of furniture that could have been a wall.
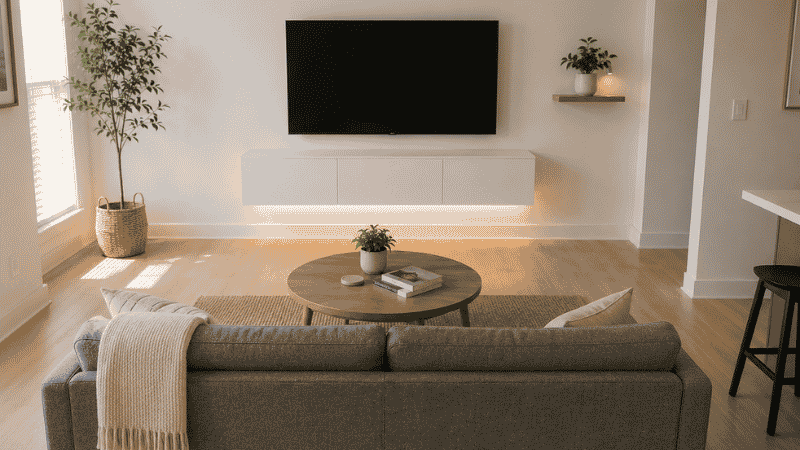
A floating media console changes this. Mounted directly to the wall at the right height — typically 24–30 inches from the floor — it creates a continuous gap between its underside and the floor. That gap is significant: the eye reads the full floor width as clear space, making the room feel wider and less cluttered. The functional storage is the same as a floor-standing unit; the visual weight is dramatically lower.
This guide covers what makes a floating media console work in a small living room — from the height and width measurements that determine whether it reads right against your TV, to the wall anchor types that determine whether it’s safe, to the complete TV wall system that turns a console into the room’s visual focal point. It also covers what renters can do when drilling into walls isn’t an option.
Key Takeaways
- The floating console height sweet spot is 24–30 inches from floor to console top: This positions the TV at the correct eye level when seated (42–48 inches to screen center) and creates maximum visible floor clearance beneath the unit
- Console width should match or exceed the TV width: A console narrower than the TV looks undersized and creates visual imbalance — the table of correct widths: 40–49-inch TV needs a 39+ inch console; 55-inch TV needs a 50+ inch console; 65-inch TV needs a 60+ inch console
- Weight capacity is non-negotiable: A floating console holds the console itself plus everything stored inside it — electronics, cables, games, etc. Minimum rated capacity should be 100 lbs; verify the wall anchoring system matches this rating
- Renters have two options: French cleat systems that mount with multiple small holes (easier to patch) or freestanding console units designed to look like floating without any wall contact
- Cable management is what separates a finished TV wall from an unfinished one: A floating console with visible cable drops looks worse than a floor-standing unit — plan cable routing before installation, not after
Why a Floating Media Console Works in a Small Living Room
The core argument for a floating media console over a floor-standing unit isn’t aesthetic preference — it’s floor space math and visual perception.
The floor space argument: A standard 60-inch media cabinet on legs sits on approximately 7.5 square feet of floor space (60 × 18 inches = 1,080 square inches). A floating console of the same dimensions mounts to the wall and occupies zero floor space. In a 120 square foot living room, that’s 6.25% of the total floor area reclaimed.
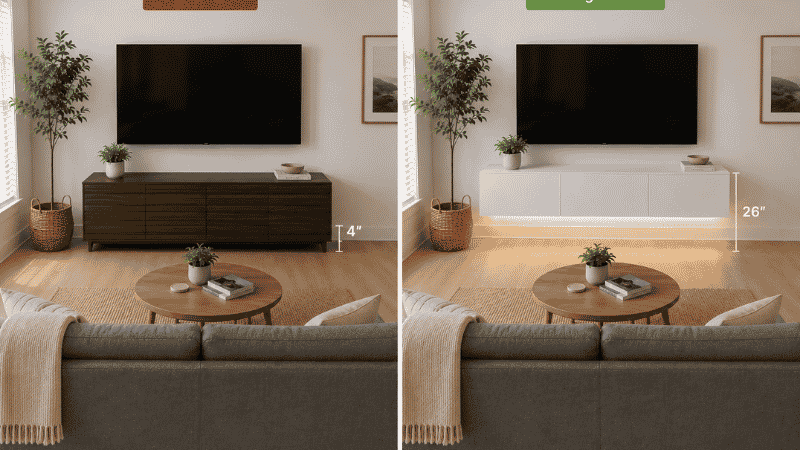
The visual perception argument: Research on spatial perception consistently shows that the amount of visible floor space in a room correlates directly with how spacious the room feels to occupants. A floating console at 24–30 inches height exposes the full floor-to-console gap — approximately 24–30 inches of visible floor across the entire TV wall. A floor-standing unit on 4-inch legs shows only 4 inches of floor beneath it. The cognitive effect is significant: the floating console literally reads as a smaller, lighter object despite identical storage volume.
The height advantage: A floating console positions the TV at the correct seated viewing height, which most floor-standing consoles don’t achieve. When the console surface is at 24–30 inches and a TV stand adds 2–4 inches on top, a 55-inch TV sits with its screen center at approximately 42–48 inches from the floor — the ergonomically recommended range for seated viewing at 8–10 foot distances.
Floating Media Console Sizing: The Three Measurements That Matter
Width: Match the TV, Then the Wall
The TV-to-console ratio: The console should be at least as wide as the TV, ideally 110–130% of the TV width. A 55-inch TV (49 inches wide including frame) looks best with a console of 54–64 inches. This keeps the TV from visually “floating off” a too-narrow base.
The complete sizing table:
| TV Screen Size | Approx. TV Width (with frame) | Minimum Console Width | Ideal Console Width |
|---|---|---|---|
| 40–49 inches | 36–44 inches | 39 inches | 44–52 inches |
| 50–55 inches | 44–49 inches | 48 inches | 54–62 inches |
| 60–65 inches | 53–58 inches | 57 inches | 62–70 inches |
| 70–75 inches | 62–67 inches | 65 inches | 70–80 inches |
The wall consideration: In small living rooms under 12 feet wide, the console width should also not exceed 2/3 of the total wall width — the same proportion rule that applies to sofas. A 60-inch console on a 96-inch (8-foot) wall looks proportionally correct; the same console on a 72-inch (6-foot) wall consumes 83% of the wall and leaves no breathing room for flanking decor or open wall space.
Height: The TV Eye-Level Formula
The floating console height determines whether TV viewing is comfortable. The formula:
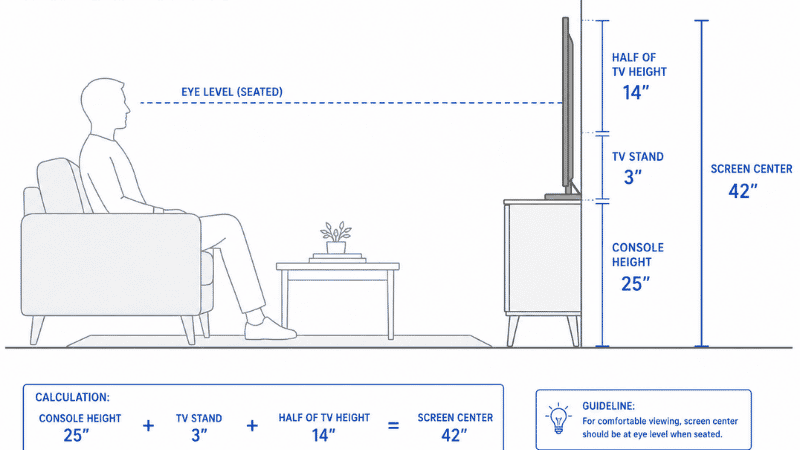
Console surface height = desired TV screen center height − (TV height ÷ 2) − TV stand height
For a 55-inch TV (height approximately 28 inches) with screen center desired at 42 inches: 42 − (28 ÷ 2) − 3 = 25 inches console surface height
For a 65-inch TV (height approximately 33 inches) with screen center at 45 inches: 45 − (33 ÷ 2) − 3 = 25.5 inches console surface height
The result for most living room configurations: console surface at 24–28 inches from floor positions the TV at correct seated viewing height.
Why this matters beyond comfort: A TV mounted too high causes neck strain during extended viewing. Research published in Applied Ergonomics (Hedge, 2013) found that screens positioned above eye level for extended periods are associated with increased cervical muscle fatigue — a direct physical consequence of aesthetically driven “high mounting” that many interior design guides recommend without this context.
Depth: The Cable Management Constraint
Floating consoles are typically 12–18 inches deep. This depth determines:
- Storage capacity: 16–18 inches accommodates standard AV equipment (cable box, streaming stick, game console, router)
- Cable routing space: The area behind the console — between the wall and the console back — is where cables route downward. With the console 12 inches deep, cables dropping from the TV above need a channel (cable raceway or in-wall routing) to stay concealed. With 18 inches deep, there’s more shadow area to hide cables, though in-wall routing is still the cleanest solution.
Slim TV Console: When Less Depth Is the Right Choice
A slim TV console — typically 10–14 inches deep versus the standard 16–18 inches — trades storage volume for visual lightness and wall proximity. In rooms under 10 feet wide where console depth affects walkway clearance, a slim profile is often the correct functional choice.
What a slim console holds: At 10–12 inches interior depth, a slim console accommodates:
- A streaming device (Apple TV, Roku, Chromecast) — all under 8 inches deep
- A soundbar (typically 3–4 inches deep, sits in front of the console)
- Remotes, cables, and small accessories
- Two or three items maximum per enclosed cabinet section
What a slim console cannot hold: A traditional cable box or satellite receiver (typically 11–13 inches deep), a full-size gaming console (PlayStation/Xbox, typically 12–14 inches), or a DVD/Blu-ray player without modification. If any of these are required, specify 16-inch interior depth minimum.
The slim console sweet spot: For apartments where the TV is primarily used with a streaming stick or Apple TV and a soundbar, a 10–12-inch slim floating console provides the aesthetic of a floating unit with the minimum possible footprint. This combination is increasingly the reality for viewers under 35 who don’t own physical media or traditional cable equipment.
Media Console with Storage: What to Look for When Storage Is the Priority
A floating media console with storage — enclosed cabinets, drawers, or a combination — serves a different function than an open-shelf model. The enclosed storage can conceal electronics, gaming controllers, cables, and accumulated living room items that have no other home.
The 80/20 storage rule for TV walls: 80% of TV wall storage should be concealed (closed cabinets), 20% open (display shelves for plants, books, objects). This ratio produces a TV wall that reads as clean and intentional rather than cluttered. A fully open console — all shelves, no doors — makes every cable, every device, and every accumulated item visible and requires constant maintenance to look organized.
Cabinet door types and their trade-offs:
Push-to-open (no visible hardware): Cleanest visual profile. Requires a precise push mechanism that can loosen over time. Best for low-traffic cabinets.
Hinged doors: Most practical for daily access. For floating consoles, note which way the doors swing relative to the seated viewing position — doors that open toward the viewer require the viewer to stand or lean forward to avoid the open door.
Sliding doors: No swing clearance needed. Only half the cabinet is accessible at any time. Good for low-frequency items.
Drawer depth consideration: Drawers on floating consoles are typically 2–4 inches deep (the console’s interior depth minus the back panel and mounting plate). At 3 inches deep, a drawer holds remote controls, batteries, and flat accessories; it cannot hold a gaming controller or headphones without modification.
How to Install a Floating Media Console: The Three Methods
Installation is the most anxiety-producing part of buying a floating console, and the most important to get right. A console holding 40–80 lbs of electronics plus its own weight (typically 40–100 lbs for furniture-grade units) must be anchored correctly.
Method 1: Stud-to-Stud Mounting (Most Secure)
The gold standard. Lag screws or heavy-duty bolts pass through the mounting bracket and into wall studs — the 2×4 or 2×6 vertical framing members inside the wall, spaced at 16-inch intervals in standard US construction.
Finding studs: Use a stud finder or the knock method (a hollow sound indicates open wall cavity; a solid, duller sound indicates a stud). Confirm with a small pilot hole before committing to the full installation. Most floating console mounting brackets require 2–3 studs to achieve the necessary weight distribution.
When studs don’t align with the console’s mounting points: A horizontal blocking board (a length of 2×4 or 2×6 wood spanning between two studs behind the wall, anchored into both) creates a continuous horizontal anchor point at any horizontal position. This is a standard installation approach requiring temporary wall opening, typically done by a contractor.
Method 2: Toggle Bolts / Molly Bolts (For Hollow Walls Without Stud Access)
When stud locations don’t line up with mounting points, heavy-duty toggle bolts or molly bolts expand behind the drywall to create anchor points. Quality toggle bolts rated for 50–100 lbs per bolt are appropriate for lighter consoles (under 80 lbs total load) when installed into drywall of at least 1/2-inch thickness.
Important caveat: Toggle bolt ratings assume the bolt is the limiting factor, but drywall itself is the limiting factor in high-load situations. For consoles expected to hold full electronics loads, always prioritize stud anchoring when possible.
Method 3: French Cleat (Best for Renters and Adjustability)
A French cleat system uses two interlocking angled boards — one mounted to the wall, one attached to the console back. The console hangs on the wall-mounted cleat and can be lifted off without tools. The wall anchors are smaller and fewer than standard mounting, making patch-and-paint repair on move-out more manageable.
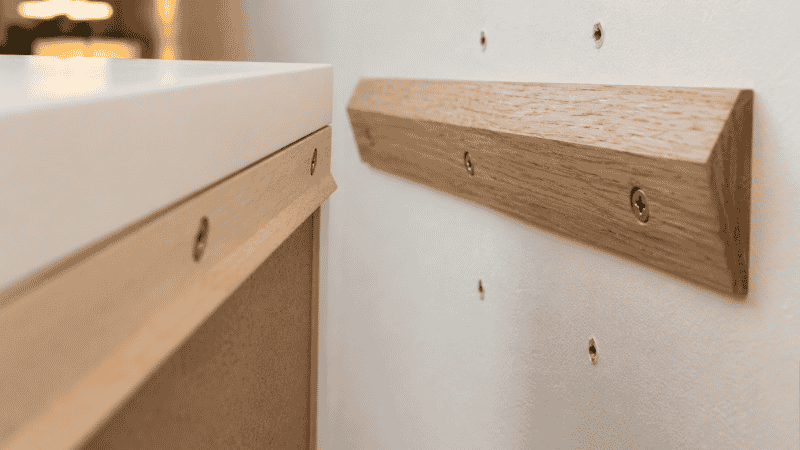
The renter advantage: A French cleat requires only 2–4 wall anchor points (versus 4–8 for standard bracket mounting), each of which patches to a small, round hole rather than a larger hardware footprint. Many landlords who prohibit “large modifications” accept small-hole anchoring when explicitly discussed in advance.
Weight limit: Quality French cleats hold 200+ lbs when properly anchored into studs. Verify the cleat’s rating before mounting a heavy console.
For Renters Who Cannot Drill: The Freestanding Option
A freestanding console designed to look like a floating unit — essentially a floor-standing console with a clean back face and legs designed to be invisible from the front — achieves the visual effect of a floating console without any wall anchoring. The console appears to float because its slim legs sit behind the console face and are hidden by the console’s shadow.
These are not true floating consoles but achieve 80% of the visual effect with zero installation requirements. Look for units with legs no higher than 4 inches (visible floor gap maintained) and a back panel that faces the wall cleanly.
Cable Management: The Step Everyone Gets Wrong
A floating console with visible cables running down the wall negates most of the aesthetic benefit. This is the step that separates a finished TV wall from an unfinished one.
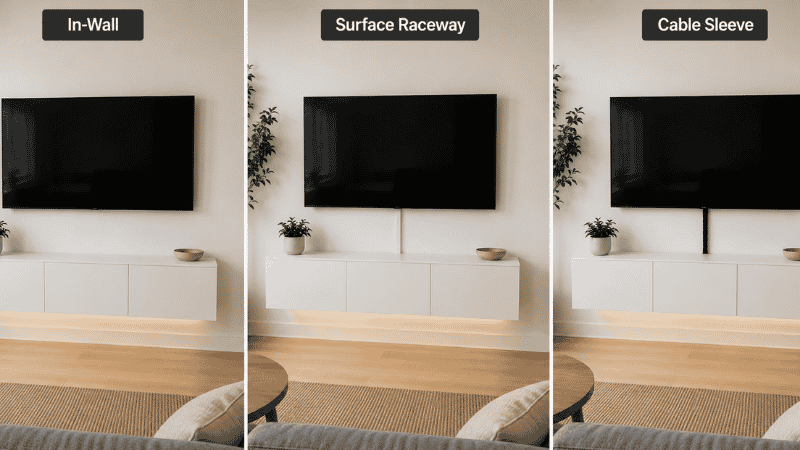
Option 1: In-wall cable routing (Best result)
A cable management kit threads HDMI, power, and device cables through the wall behind the TV, exiting through a second hole behind or inside the console. The wall surface shows nothing. This requires drilling two holes (one behind the TV, one behind the console) and is permanently installed — not appropriate for renters without approval.
Option 2: Surface cable raceway (Renter-friendly)
A paintable cable raceway — a rigid plastic channel that mounts to the wall surface with adhesive or small screws — routes cables along the wall in a clean channel. Painted to match the wall, it becomes largely invisible at normal viewing distance. This is the standard renter solution and is completely reversible.
Option 3: Cord concealer behind the console
A flexible fabric cable sleeve bundles the cables dropping from the TV into one vertical bundle. The floating console’s shadow zone (the space between the console back and the wall) partially conceals this bundle. At viewing distance, the single bundled drop reads as significantly cleaner than multiple individual cables even if not perfectly invisible.
The Complete TV Wall System: Making the Floating Console the Room’s Focal Point
A floating console in isolation is a practical improvement. A complete TV wall system — console plus TV at the right height plus flanking elements — is the room’s visual anchor that makes the entire space read as designed.
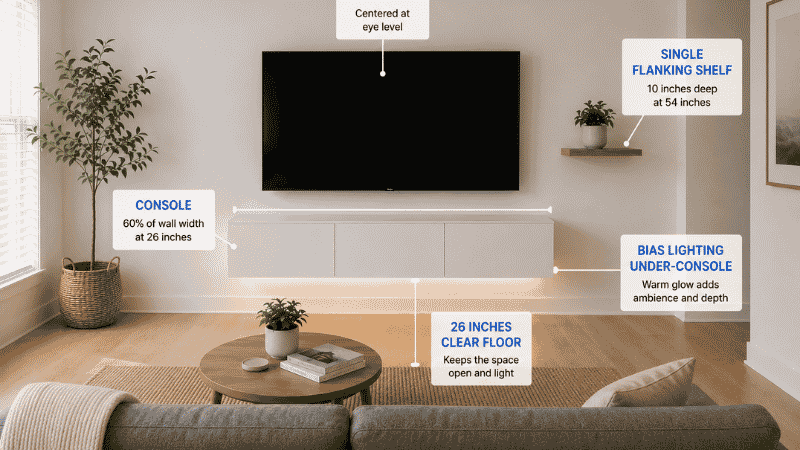
The TV wall formula for small living rooms:
Console: 60% of the wall width, mounted at 24–28 inches height. This is the anchor element.
TV: Centered above the console at eye level. No gap between TV bottom and console top — TV mounts directly above or on a low stand on the console surface (2–4 inches stand height).
Flanking elements: Two options. Option A: no flanking elements — let the console and TV form a clean, minimal composition. This reads as contemporary and deliberate. Option B: one or two floating shelves at the same depth as the console, positioned 6–8 inches to the side and at different heights, holding a single plant and one or two books each. This extends the TV wall composition horizontally without adding floor furniture.
Lighting: LED strip lights mounted to the underside of the console shelf, facing the wall, create a warm glow that outlines the console from below. This “bias lighting” reduces eye strain during viewing (by reducing contrast between the bright TV and the dark room) and makes the floating console appear to hover rather than sit against the wall. A single warm-white LED strip across the full console width costs under $30 and is the single highest-impact TV wall upgrade available.
If Your Floating Console Isn’t Staying Level
Level installation is the most common floating console problem. Even a 1-degree tilt becomes visible at 8 feet when the console holds objects with visible horizontal lines (books, remotes, game cases).
Before installation: Mark the console mounting height on the wall with a level line using a spirit level or laser level. This is the step most DIY installs skip. The mounting bracket must be aligned to this line, not eyeballed.
After installation: If the console tilts despite a level bracket, the wall itself may not be plumb — common in older apartments. Place a shim (a thin wedge of wood or folded cardboard) behind the lower end of the mounting bracket before final tightening.
If the console wobbles: The mounting points are not all fully engaged with the wall anchor material. Remove the console, check each anchor point individually, and reinstall with the anchor in firm contact with the wall material (stud, drywall, or toggle bolt expanded fully).
FAQ: Floating Media Console
What height should a floating media console be? The console surface should be at 24–28 inches from the floor. This positions the TV screen center (add console height + half of TV height) at approximately 42–48 inches from the floor — the ergonomically recommended range for comfortable seated viewing at 8–10 feet viewing distance.
What size floating media console do I need for a 55-inch TV? A 55-inch TV measures approximately 48–49 inches wide including the frame. The console should be at minimum 50 inches wide, ideally 54–62 inches wide. A console narrower than the TV creates visual imbalance. The full sizing table above covers 40-inch through 75-inch TVs.
Can a floating media console hold heavy electronics? Yes, when properly installed into wall studs. Floating consoles mounted into studs with correctly rated hardware hold 100–200+ lbs depending on the bracket system. The limiting factor is not the console itself but the wall anchoring — always verify the mounting hardware is rated for the combined weight of the console, contents, and any TV mounted above it.
Can renters install a floating media console? Yes, with some conditions. The most renter-friendly approach: a French cleat system requiring 2–4 small anchor points (easier to patch on move-out) or a freestanding unit designed to look like a floating console with no wall contact. If drilling, discuss the scope with your landlord first — small-diameter, few-hole anchoring for furniture is often more acceptable than large-scale installation.
What is the difference between a floating media console and a TV stand? A floating media console mounts to the wall with no floor contact — zero floor footprint, visible floor gap beneath. A TV stand is freestanding on legs with a floor footprint equivalent to its dimensions. The floating console offers visual lightness and floor space recovery; the TV stand requires no installation and can be repositioned freely.
How do I hide cables with a floating media console? Three approaches by complexity: (1) in-wall cable routing through two drilled holes — invisible result, permanent installation; (2) surface cable raceway painted to match the wall — nearly invisible, fully removable; (3) cable sleeve bundling multiple cables into one vertical drop — significantly cleaner than individual cables, no installation required.
The Bottom Line
A floating media console is the highest-impact single change available for a small living room TV wall — not because it adds storage (it holds roughly what a floor-standing unit holds), but because it removes floor furniture from the room’s most-viewed wall and replaces it with visible floor space. Combined with correct TV height, clean cable management, and simple flanking elements, it transforms a functional TV setup into the room’s focal point.
Mount it at 24–28 inches. Size it to 110–130% of TV width. Route the cables before the console goes up, not after. That’s the sequence.
For the complete living room furniture picture — including how the media console relates to the sofa, coffee table, and rug — our furniture ideas for small living rooms guide covers the full sizing formula. For TV wall placement relative to the sofa and seating zone, our small living room layout guide covers the six arrangement formulas by room shape.
References
- Hedge, A. (2013). Ergonomics in computerized offices. In Salvendy, G. (Ed.), Handbook of Human Factors and Ergonomics (4th ed.). Wiley. (Research on screen height and cervical muscle fatigue from above-eye-level viewing positions)
- American Society of Interior Designers (ASID): Residential space planning guidelines — minimum clearance standards and furniture weight distribution requirements for wall-mounted furniture in residential settings
- Society of Motion Picture and Television Engineers (SMPTE): Recommended viewing distance and screen center height standards for flat-panel displays in residential viewing environments
Published on Grainv.com | Category: Living Room · Storage Furniture | Related: Furniture Ideas for Small Living Rooms, Small Living Room Layout, Living Room Storage Ideas